
End Games
Grigoriev 1932 study
In the endgame position on the right, white has many ways of missing a win. One set of moves will win, but just one slip- up will allow the defender to avoid loss. Notice first that immediately advancing the a-pawn will allow black to play Ke4, easily winning that pawn. The obvious gain of opposition is correct for white: Kf5. Now look at the position after black replies with Ke3. White still cannot advance the a-pawn without losing it, so the obvious move, Ke5, is the only hope of a victory. Note that there is a trap that black may set: Instead of making the best move, which is c6, black may try Kd3, hoping that white will play Kd5 and then after black plays c6+ white will capture that pawn, allowing the black king to obtain the opposition with Kc4, winning the white pawn and getting a draw. The problem is this: White can just block the pawn with Kc5, getting an easy win by pushing the a-pawn. A pawn endgame can be tricky, and this is just the beginning in this one. After 2. Ke5 c6, the white king is blocked from moving toward the left. Black has a problem, too, for the black king can no longer chase the white pawn using a direct approach along the diagonal (d4 is not available. In other words, it is now time for white to advance the a-pawn. A brief calculation shows that if white were to move Kd6, in the position on the right, black would play Kd4 gaining the opposition and eventually winning the a- pawn and drawing the game. The obvious move for white is a4. Be aware that white cannot allow the black king to get to the c4 square while the white pawn is at a4. The only hope for white to win is with 4. a5. After 4. a5 c5, the only hope for either side is in a simple pawn race. The time of the kings is over, for the moment. White promotes a pawn first but just barely. Will it make a difference? In this case, yes, and white can win. That does not mean it will be easy. How easy for white to allow black to draw in this position! If the black king can get to a1, the queen capturing the pawn will make a stalemate. But how can white prevent the defending king from reaching that square? Here’s a clue: If the queen can get to c1, the black king will be unable to get to a1, and the white king may push the black king away from protecting the pawn: an easy win. Now find a move that pushes the black king away from the a1 corner. When white moves 8. Qd5+, it may appear that black will be able to move toward the key square in the corner with 8. . . . Kc3, but that fails to 9. Qd4+, obtaining the a1 square for the queen and easily winning, for the defending king will be on the wrong side of its pawn, being forced to move to b3. The queen will get sole access to c1. This may be the only move that forces a win for white: 8. Qd5+! And yet the tricks are not over in this pawn end game. White has a tactical trick, if black tries the move 8. . . . Ke3. It’s 9. Qg2, which wins by a skewer if black promotes the pawn and wins by the same move (Qg5) if the black king protects the pawn, for the queen can then move 11. Qc1 So black moves the king to e2. How can white keep the black king out of the a1 corner and also stop that pawn from queening? White can stilll win this endgame, but victory comes from a tricky maneuver. Did you know that a defender in this kind of position can sometimes be cornered and checkmated AFTER getting that pawn promoted? It can, and this is one of those positions. According to the book Practical Chess Endings, by Irving Chernev, the conclusion by Grigoriev is as follows: 9. Qa2! Kd1 10. Kd4 c1(Q) 11.Kd3 and white wins Perhaps Mr. Grigoriev overlooked a tricky resource for the defender, or Mr. Chernev just neglected to include it in his book on endgames. Here it is: 9 . . . . Kd2 10 Kd4 Kd1 hoping that the white king will move to d3, allowing an under- promotion to a knight, forking queen and king and giving the defender a draw. This does not change the outcome, with best play on white’s side, but it gives one more hurdle to be overcome. In Diagram-10, it looks like black will finally promote that pawn soon. The white king appears to be just too far away to do much good. Yet the king has another job here. In Diagram-11, white has just moved Kd4, preparing to corner the black king. On the surface, white and black appear equal in Diagram-12. But notice that the black king is hemmed in at the edge, and the black queen is also cramped. In Diagram-13 we see a strange lack of reasonable moves available to black. In fact, giving away the black queen is the best defense, and that delays checkmate for only about one move.
© 2015 Jonathan David Whitcomb


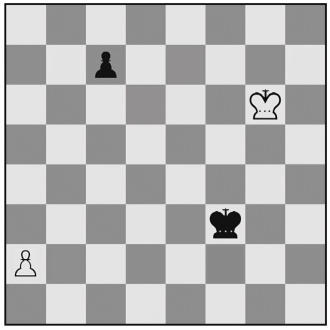
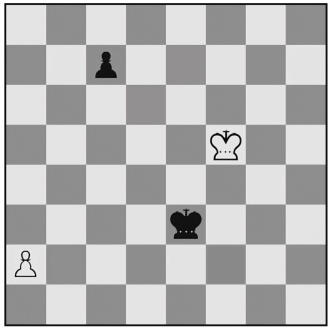
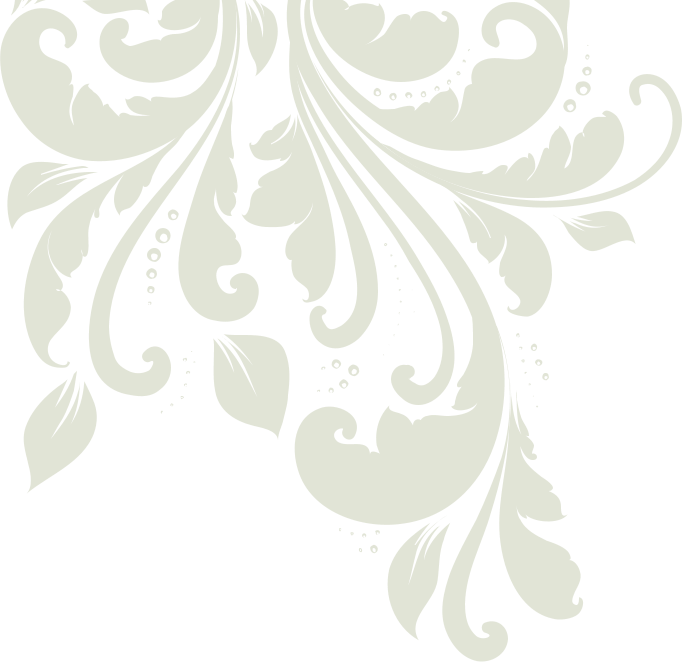
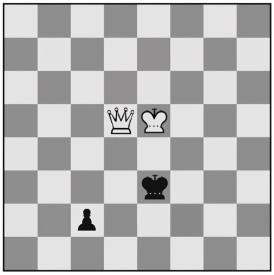
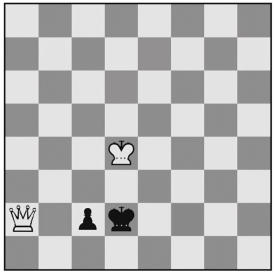
Diagram-01: Grigoriev, 1932, white to move and win
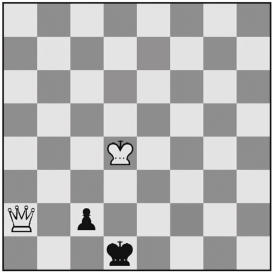
Diagram-02: After 1. Kf5 Ke3, white should now play 2. Ke5
Diagram-03: Black has just played 2. . . . c6
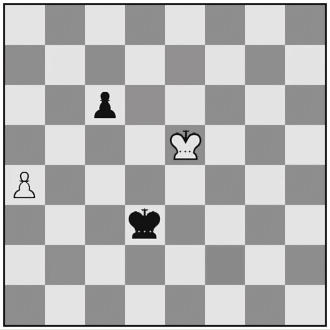
Diagram-04: Position after 3. a4 Kd3
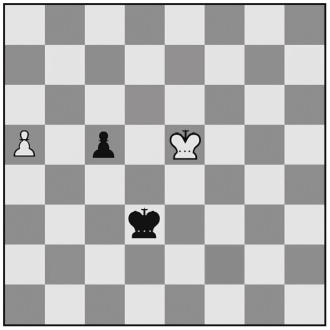
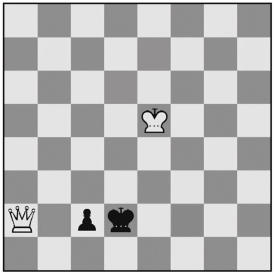
Diagram-05: The pawn race begins
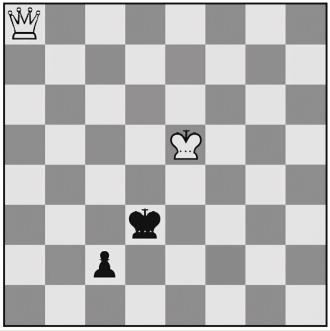
Diagram-06: Three moves later: white to move and win
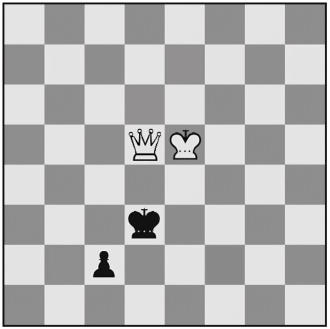
Diagram-07: after 8. Qd5+!
In response to 8. . . . Ke3, white wins with
9. Qg2 and on the next move 10. Qg5(+)

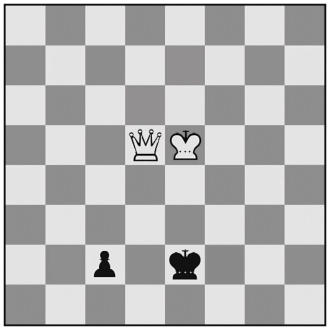
Diagram-08: after 8. . . . Ke2. Now what does white do?
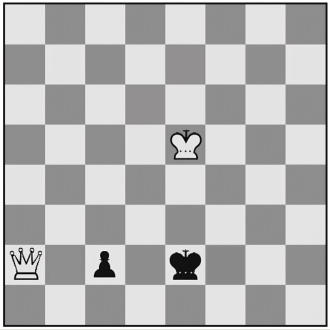
Diagram-09: after 9. Qa2! The traditional response, that
may have been taken for granted, is 9. . . . Kd1

9. . . . Kd2 begins to set a trap for white
With 10. Kd4 white approaches the trap
There’s the trap. If white moves Kd3, the pawn
promotes to a knight, drawing the game. The
right move is Kc3! so that a queen promotion
will allow white to finally win with Kd3.
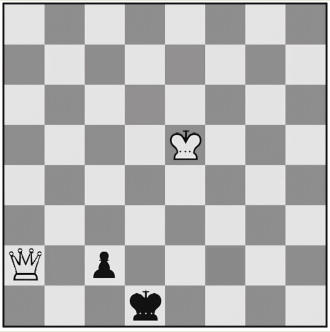
Diagram-10: White can delay the pawn promotion with
Qb3 of course but black would move Kd2. White has a trap,
however, and it’s one that the defender cannot avoid.
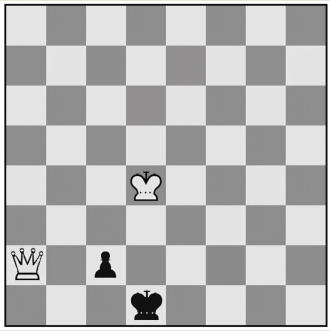
Diagram-11: White has just moved 10. Kd4, allowing the
pawn to promote, and underpromotion is useless.
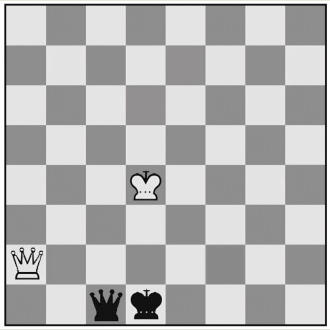
Diagram-12: Black has just promoted a pawn to a queen.
Do you see how white can win?
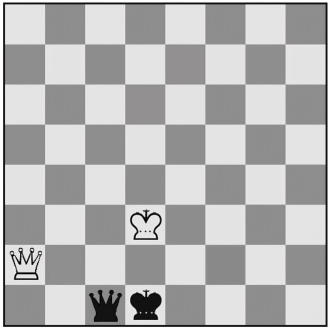
Diagram-13: After white has moved Kd3, black has no way
to avoid mate for long. How complex can be what at first
appeared to have been a simple pawn endgame!
Succeed in the
Endgame

“In order to improve your game,
you must study the endgame
before everything else.” Capablanca
“By positional play a master tries to prove and
exploit true values, whereas by combinations
he seeks to refute false values ... A combina-
tion produces an unexpected reassessment
of values.” Emanuel Lasker


End Games
Grigoriev 1932 study
In the endgame position on the right, white has many ways of missing a win. One set of moves will win, but just one slip-up will allow the defender to avoid loss. Notice first that immediately advancing the a- pawn will allow black to play Ke3, easily winning that pawn. The obvious gain of opposition is correct for white: Kf5. Now look at the position after black replies with Ke3. White still cannot advance the a-pawn without losing it, so the obvious move, Ke5, is the only hope of a victory. Note that there is a trap that black may set: Instead of making the best move, which is c6, black may try Kd3, hoping that white will play Kd5 and then after black plays c6+ white will capture that pawn, allowing the black king to obtain the opposition with Kc4, winning the white pawn and getting a draw. The problem is this: White can just block the pawn with Kc5, getting an easy win by pushing the a-pawn. A pawn endgame can be tricky, and this is just the beginning in this one. After 2. Ke5 c6, the white king is blocked from moving toward the left. Black has a problem, too, for the black king can no longer chase the white pawn using a direct approach along the diagonal (d4 is not available. In other words, it is now time for white to advance the a-pawn. A brief calculation shows that if white were to move Kd6, in the position on the right, black would play Kd4 gaining the opposition and eventually winning the a-pawn and drawing the game. The obvious move for white is a4. Be aware that white cannot allow the black king to get to the c4 square while the white pawn is at a4. The only hope for white to win is with 4. a5. After 4. a5 c5, the only hope for either side is in a simple pawn race. The time of the kings is over, for the moment. White promotes a pawn first but just barely. Will it make a difference? In this case, yes, and white can win. That does not mean it will be easy. How easy for white to allow black to draw in this position! If the black king can get to a1, the queen capturing the pawn will make a stalemate. But how can white prevent the defending king from reaching that square? Here’s a clue: If the queen can get to c1, the black king will be unable to get to a1, and the white king may push the black king away from protecting the pawn: an easy win. Now find a move that pushes the black king away from the a1 corner. When white moves 8. Qd5+, it may appear that black will be able to move toward the key square in the corner with 8. . . . Kc3, but that fails to 9. Qd4+, obtaining the a1 square for the queen and easily winning, for the defending king will be on the wrong side of its pawn, being forced to move to b3. The queen will get sole access to c1. This may be the only move that forces a win for white: 8. Qd5+! And yet the tricks are not over in this pawn end game. White has a tactical trick, if black tries the move 8. . . . Ke3. It’s 9. Qg2, which wins by a skewer if black promotes the pawn and wins by the same move (Qg5) if the black king protects the pawn, for the queen can then move 11. Qc1 So black moves the king to e2. How can white keep the black king out of the a1 corner and also stop that pawn from queening? White can stilll win this endgame, but victory comes from a tricky maneuver. Did you know that a defender in this kind of position can sometimes be cornered and checkmated AFTER getting that pawn promoted? It can, and this is one of those positions. According to the book Practical Chess Endings, by Irving Chernev, the conclusion by Grigoriev is as follows: 9. Qa2! Kd1 10. Kd4 c1(Q) 11.Kd3 and white wins Perhaps Mr. Grigoriev overlooked a tricky resource for the defender, or Mr. Chernev just neglected to include it in his book on endgames. Here it is: 9 . . . . Kd2 10 Kd4 Kd1 hoping that the white king will move to d3, allowing an under- promotion to a knight, forking queen and king and giving the defender a draw. This does not change the outcome, with best play on white’s side, but it gives one more hurdle to be overcome. In Diagram-10, it looks like black will finally promote that pawn soon. The white king appears to be just too far away to do much good. Yet the king has another job here. In Diagram-11, white has just moved Kd4, preparing to corner the black king. On the surface, white and black appear equal in Diagram-12. But notice that the black king is hemmed in at the edge, and the black queen is also cramped. In Diagram-13 we see a strange lack of reasonable moves available to black. In fact, giving away the black queen is the best defense, and that delays checkmate for only about one move.

© Jonathan David Whitcomb 2015
